Just popping in to wish you all a very Merry Christmas and a Happy New Year 2017!!
The last of my family arrive this evening and all the preparations are in full swing. I hope you all have a wonderful time whether you celebrate Christmas or are celebrating in another way.
Thank you all for visiting me here and I look forward to seeing you all again in the New Year!
Earlier this year I shared with you some sneaky peeks at a quilt I was making for a friend's daughter who was expecting her first baby (my friend's first grandchild). I am pleased to say that the baby, a little girl, has now arrived which means I can show you the finished quilt.
My friend chose the fabrics to co-ordinate with the decorations in the nursery. I randomly pieced a central panel of fabrics adding a few little personal touches, such as an appliqued bee and heart as well as some pieces of ribbon. (Shown below before the quilt was quilted).
I then added a narrow darker border trim, followed by a wider border in a white on white print. The central panel was free motion quilted using an open all over swirl pattern.
The outer border was then more densely quilted with another swirly pattern with the motifs much closer to one another. Finally, I added a binding to match the inner narrow border.
All in all I was really thrilled with the finished quilt. My friend really liked it too and I am hoping that her daughter and the new baby will love it as well!
I am really pleased with myself today as I have managed to get my new Christmas quilt which I made using the blog hop blocks from the Winter Wandering blog hop finished.
I didn't finish the quilt exactly as the pattern instructions indicated as I wanted to make sure I had time to piece the quilt together and also to have the chance to try out some free motion quilting in the sashing and borders. The smaller finished size suited me better too.
I am really happy with it and it is ready to hang up with the rest of my Christmas decorations.
The quilting included 'in the ditch' quilting with a walking foot around each of the blocks followed by some free motion quilting in the sashing and borders.
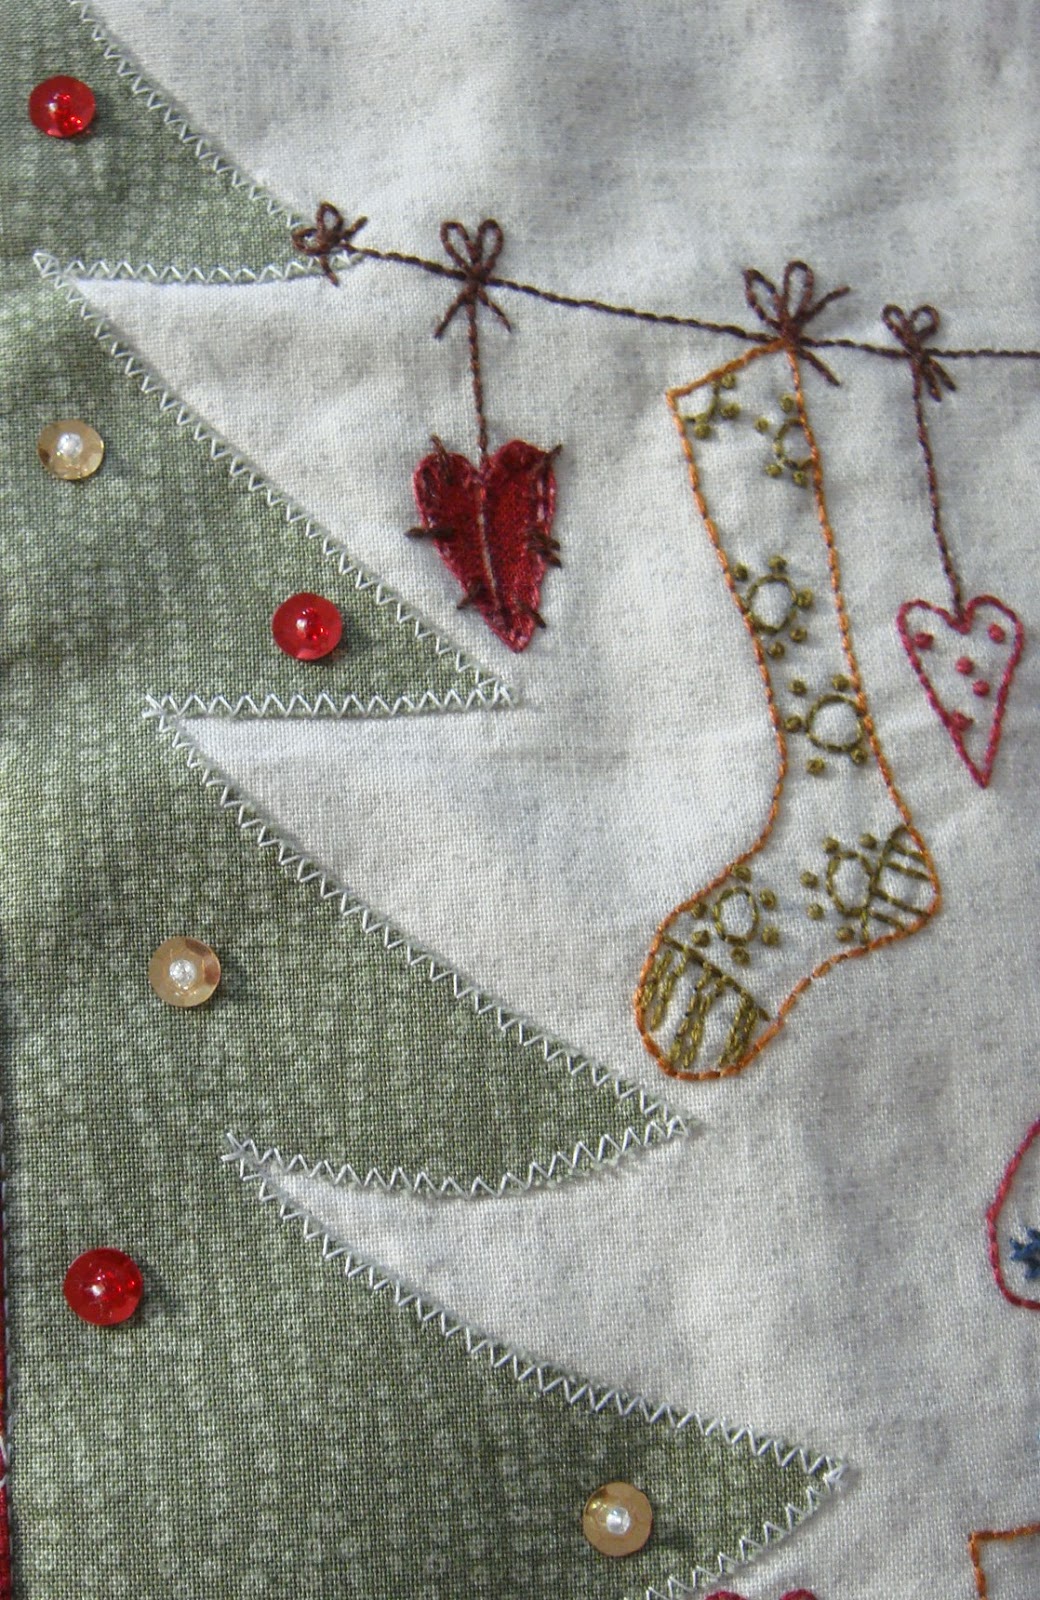
I didn't want to detract from the embroidery so I didn't quilt the centre panels of the blocks but, in order to hold the layers of the quilt together in these areas I added some sequins as snowflakes in a couple of the blocks and baubles on the Christmas trees in the block with the stockings.
I also added a cute little owl button to the block with the house. These all helped to tie the layers in the centre of the blocks together.
If you would like to download the patterns for the blocks you can find them at the following links:
Block one and instructions from Ellie's Quilt Place here.
Block two from Bobbin here.
Block three from Gail Pan here.
Block four from Jubama here.
Thank you to the designers for each of their beautiful blocks.... it was a lot of fun to make!
Earlier in the year as I was improving my free motion quilting skills, I decided to try and make a QAYG sampler quilt similar to the one which appears in the book 'First Steps to Free Motion Quilting' by Christina Cameli.
The basic idea is to make blocks using solid fabrics and to practise a different free motion quilting technique on each of the blocks then, piece them together using a QAYG technique. In the book I think Christina makes thirty blocks but I only made twelve, so the finished quilt is a lot smaller.
I had made and pieced together all the blocks quite some time ago (before I moved house) but, I just hadn't got round to binding the quilt.... until this last week.
It is now finished and I am very happy with the finished lap-sized quilt. To see the individual blocks in more detail, you can visit my FMQ Sampler Quilt 2016 page.
Over the last few days I have managed to get the last block of the new Christmas quilt I am making finished. This block was designed by Jubama and is the last block in the Winter Wandering blog hop. It is a very sweet block and was a lot of fun to make.
I also managed to adjust the other blocks which (if you read my last post about this quilt) I had miscalculated and were a different size than they should have been. Thank you to everyone who posted a suggestion how to adjust them so they were all the same size.
In the end I did what several of you suggested and unpicked the borders around them, added larger borders and then trimmed them down so that they all measured the same. Now I just need to get some sashing made and the top pieced together. I should still be able to get that done in time for Christmas!
This week's stitch for the TAST Challenge hosted by Sharon Boggon at Pin Tangle is a really pretty little stitch called 'Raised Cup Stitch'. It is exactly what it sounds like it is going to be and is a cute little raised cup.
It was quite a fiddly little stitch to embroider but it is worth the effort. There is a base of straight stitches and the 'walls' of the cup are created by working another knotted stitch through these base stitches. Sharon's tutorial for the stitch is here.
I added three little pink 'cups' to the centre of one of my circles and I added three seed pearls to the centre of each of the cups. It makes a pretty little flower.
Those of you who follow my blog will know that since I have been trying to improve my free motion quilting, I found and now follow Lori Kennedy's blog 'The Inbox Jaunt'. Lori recently hosted a Sunflower Sampler Quilt-A-Long, which was a lot of fun and I have already showed you the two Sunflower quilts that I made following along.
After her final post for the Sunflower QAL Lori posted about another quilt she had made using a Poinsettia as the central motif instead of a Sunflower.... perfect for Christmas.... and she encouraged her readers to have a go at the Poinsettia motif.
Her tutorial for the Poinsettia is here and, if you go and have a look you will see that at the end of the tutorial she suggests that these motifs would look great on a table runner. Well, as I wanted to try the Poinsettia motif but already had the two Sunflower quilts, I decided that I would make myself a Poinsettia table runner for Christmas instead of another wall quilt.
As you can see, I quilted three Poinsettias in the middle of the runner, quilted in the ditch around the checked inner border and then added some simple loopy Holly quilting to the outer border. I am really thrilled with my new table runner.... I loved quilting the Poinsettia design and it is all finished in time for Christmas! Thank you Lori!
This week's stitch for the TAST Challenge hosted by Sharon Boggon at Pin Tangle is a really pretty combination of stitches which results in the Twisted Lattice Band. Sharon's tutorial for it is here.
The base stitch is a row of double herringbone stitches (one of my firm favourite stitches!) which I added to my sampler in a green cotton perle (8) thread inside one of my partial circles along one of the edges. A top thread is then laced in and out of the base herringbone stitches.
I used a variegated silk thread to add the top laced stitches. As the thread is fine, it has added quite a subtle touch of colour to the base. I love the resulting twisted lattice band and, it was great fun to stitch!
A couple of weeks ago I posted about a new Christmas quilt that I had started. It is a free project called 'Winter Wandering' and is a blog hop between four designers.
The first block was designed and posted by Ellie of Ellie's Quiltplace and features a very cute snowman. You can also find all the details for piecing together the final quilt on Ellie's blog. I have added his red border this week!
I have also finished the second block, which was designed by Els at Bobbin and is a perfect Christmas scene with stockings galore! If you have seen the pattern, you may notice that there is a stocking missing from my block. That is because I printed the pattern out too large for the background fabric.... I should have checked before I appliqued the trees!! So I adjusted by missing out one of the stockings!
Actually, I also made a mistake with the first block too! As I don't have any metric quilting rulers I was converting the cm dimensions into inches which is fine, except that I was so concentrated on making sure that I made an accurate conversion, I forgot to add on the seam allowances! I am not sure yet how I will piece the different sized blocks together but I am sure I can make it work!!
The third block is a very sweet reindeer design by Gail Pan. Isn't he adorable? I finished stitching him last night. A very pretty little stitchery and some appliqued holly.... perfect!
I'm looking forward to the last block now so that I can get the quilt finished and quilted in time to hang up with my other decorations!
I am linking this post to the last 'Patchwork with Stitchery' SAL link up over at Martina's blog, 'Sunshine Quilting'. I haven't linked up every month but I have really enjoyed the sew-a-long.... thank you very much Martina!
Some of you may recall that I have been following a Quilt-a-long being hosted by Lori Kennedy at 'The Inbox Jaunt' to make a 'Sunflower Quilt'. The quilt has lots of different free motion quilting designs to try so was just perfect for me to do some more practise. Instruction for the last section to be completed in the QAL was given this last week and I have now finished my quilting and bound my quilts.
I was quilting two quilts the first made from some hand-dyed fabric which I won in a giveaway from Mary Anne at Magpie's Mumblings and which I thought would be the perfect fabric for a sunflower sampler.
I am really pleased with this little quilt now it is finished. At first I thought it was going to be too cramped as the fabric was smaller than Lori had recommended for the quilt but, I adjusted the sizes a little and it has worked out very well. I even managed to quilt my name in the corner!
The second was using a piece of solid yellow fabric (sorry the photographs aren't brilliant, the Winter light isn't easy to take photos in!) As you can see, this is a little larger and it was a lot of fun trying out some different threads.
I am very happy with them both.
This week's stitch for the TAST Challenge hosted by Sharon Boggon at Pin Tangle is a really cute stitch called 'Top Knotted Buttonhole Stitch'. I really enjoyed stitching this latest stitch and you can find Sharon's tutorial for it here.
I added a partial circle of stitching in one corner of my sampler and I used a variegated silk thread to embroider it.
It was a fun stitch to embroider but you do have to pay very close attention to your tension while working the stitch. It is very easy to pull the top knot too tight so that it doesn't sit prettily on the surface of the fabric but rather is pulled down into the fabric.
I think it could be used to make a really cute little line of flowers if you added some detached chain stitch leaves between the buttonhole stitches. I may have to try that idea at a later date!
As I mentioned in a previous post, I had three more free motion quilted mini quilts ready for binding in my sewing room. I have now had time to bind them and I am really pleased with the outcome. These little quilts are mini quilts (approximately 14 inches square) which I have made as a result of following Lori Kennedy's Craftsy Class called Divide and Conquer. At the end of the class she challenges you to make a mini quilt of each of the styles she has covered throughout the class. The one I showed you last time was called a framed composition.
This next one is a grid composition.
Then there is this diagonal composition.
Finally, there is this medallion composition.
All in all there are six different styles of quilt, so I still have two more to do. I have them all layered up and marked ready to go but I just have to find the time to quilt them! So far I am thrilled with how well the quilting is going as there have been times when I really thought I would never get the hang of it. My advice to anyone else trying to learn is to keep going, you will get there!
While I was wearing my 'binding' hat, I also decided to bind one of my recent practice pieces so that I can use it.... I'm not sure what for but it looks quite cute finished!